
Model building
Transferring Shapes of Parts to Plywood

www.e-rokodelnica.si
 Model building | Transferring Shapes of Parts to Plywood |  www.e-rokodelnica.si |
Pieces of a model can be cut out precisely only if they are drawn accurately. Accuracy is a skill that a child obtains by exercise. The task of parents and teachers is to find a balance between autonomous work and help to the child. To learn, children must do as much as they can on their own. However, assistance should be provided where an imprecise piece could endanger an entire project.
On this page, here are described some possibilities how to transfer shapes of parts from drawing to plywood.
Consider the safety at work.
| 
| 
|
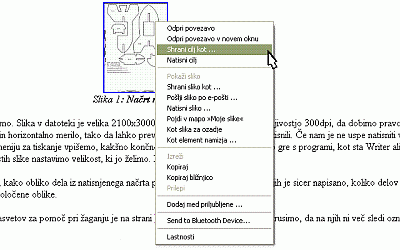 |
We save the drawing of a model so that we point the thumbnail of the drawing and press the right button on the mouse. Then, a menu opens, where we select "Save Target as". Finally, we save the drawing. |
||
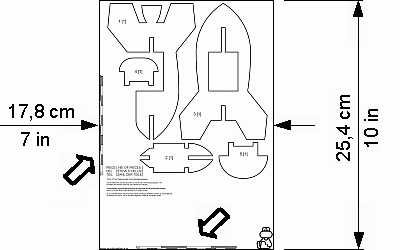 |
We print the saved drawing. The size of the drawing in the file is 2100x3000 pixels and we need to print at a resolution of 300dpi (decimal points per inch) to obtain the right scale. Final size of the drawing is 17.8 cm x 25.4 cm, that is 7in x 10in. On the drawing, there is a vertical and horizontal ruler. With them, we can check if we have printed the drawing correctly. If we fail to print it in the correct size, we can help us with programs for image processing. In these programs we can set dpi the drawing. Similarly, we can use programs such as Open Office Writer or Microsoft Word. In this case, We insert a drawing to an empty page as a picture from a file and set the size that we want. Finally, we print the page. |
 |
 |
First, we must print all patterns that we need on a piece of paper. The paper should be as hard as possible. We cut out these patterns to get stencils. Then, we push the stencil against plywood and draw a contour line around it. We must be careful not to move the stencil during we draw. Normally, we saw a part off so that a half of the thickness of a contour line remains on a work piece. This is not true for lines that are drawn with a stencil. Instead, we must check where on the line we should cut so that the made part would correspond to the part on the drawing. |
 |
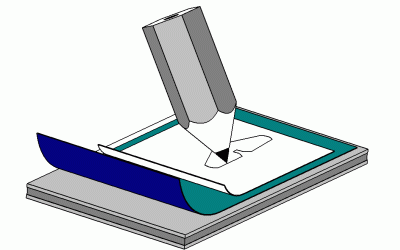 |
In the times before computers, typewriters were used. If we wanted several copies of a letter, we inserted carbon paper between sheets of paper. The carbon paper was a piece of paper that has been coated on one side with ink. When the typewriter hit the paper with a letter, its footprint was printed to all sheets. We can use carbon paper to transfer patterns from the drawing to plywood. First, we place a sheet of carbon paper on the plywood with the ink side down. Over it, we place a drawing with patterns. We fix the drawing with an adhesive tape so that it does not move. Then, we draw over all contour lines with a pencil. Its tip prints ink from carbon paper to the plywood. I doubt very much that it is possible to get carbon paper for typewriters nowadays. But, you can use the blank credit transfer form. The principle is essentially the same. |
 |
 |
We can avoid transferring patterns by hand so that we glue the drawing to plywood. First we spread the adhesive slimly and evenly all over the back side of the drawing! Then we press the drawing against the plywood and wait the adhesive to dry. At the end, remains of the paper are removed from made parts by abrasive paper. |
 |